FasCard Admin Site - User Accounts
The User Accounts page is only accessible to users with Admin or User Manager privileges. This page is used to add, edit, and delete user accounts and assign system privileges. The User Account page also allows an administrator to control which locations a user may access.
Managing User Accounts
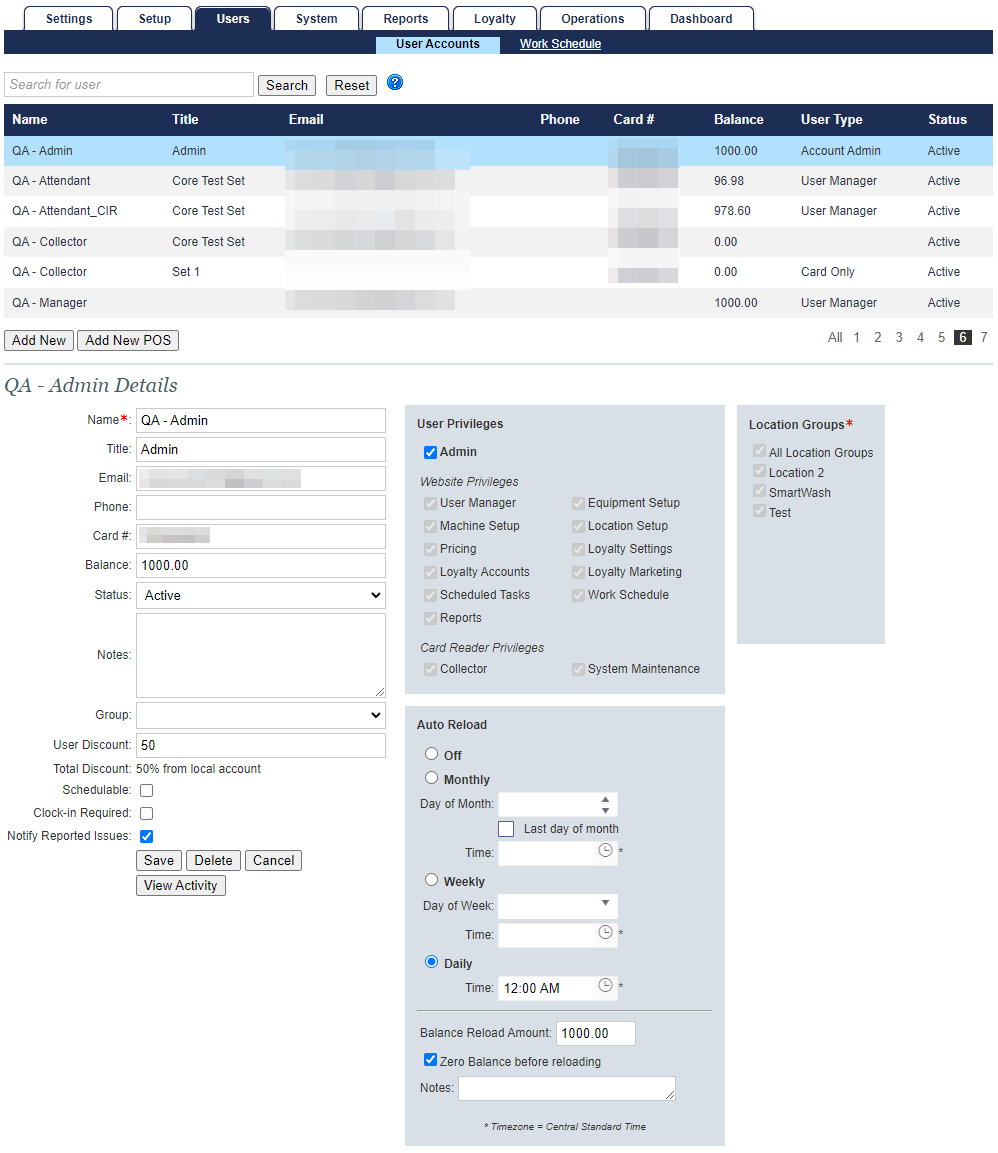
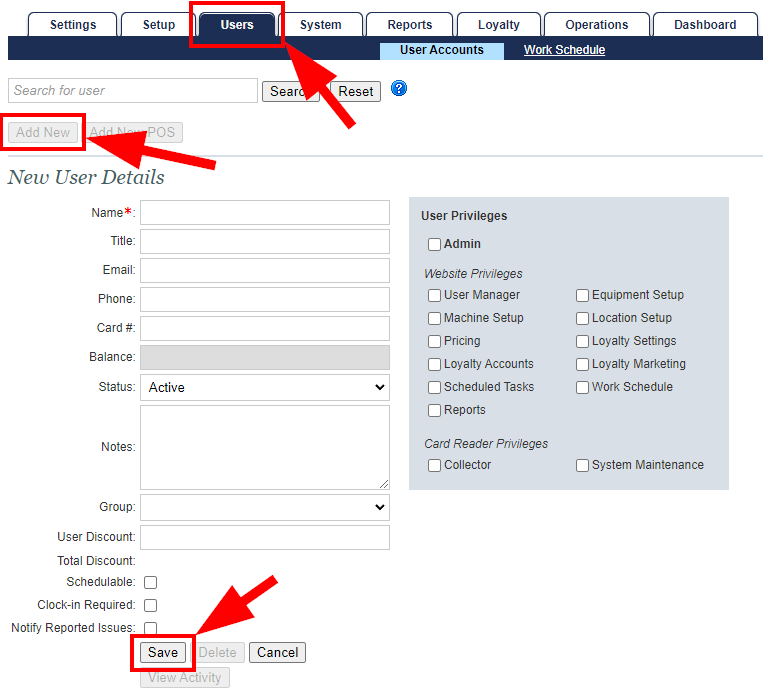
Navigating to the User Accounts page under the Users tab will display an alphabetical list of the users that have been configured for the system. Clicking anywhere on a user's row will display the additional details in the 'User Details' section of the page. Clicking the Add New button, which allows a new user to be added.
User Accounts are not eligible for Loyalty programs (e.g. free dry, loyalty points, etc).
Understanding User Types and Privileges
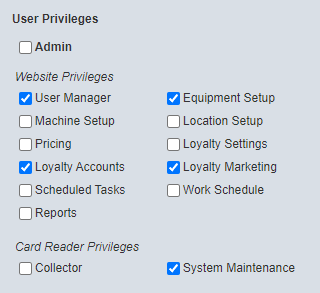
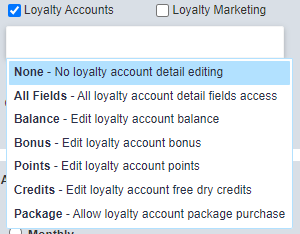
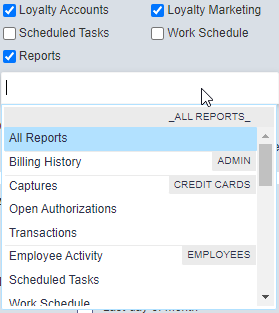
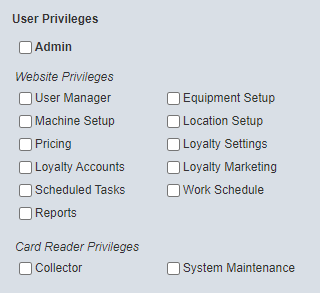
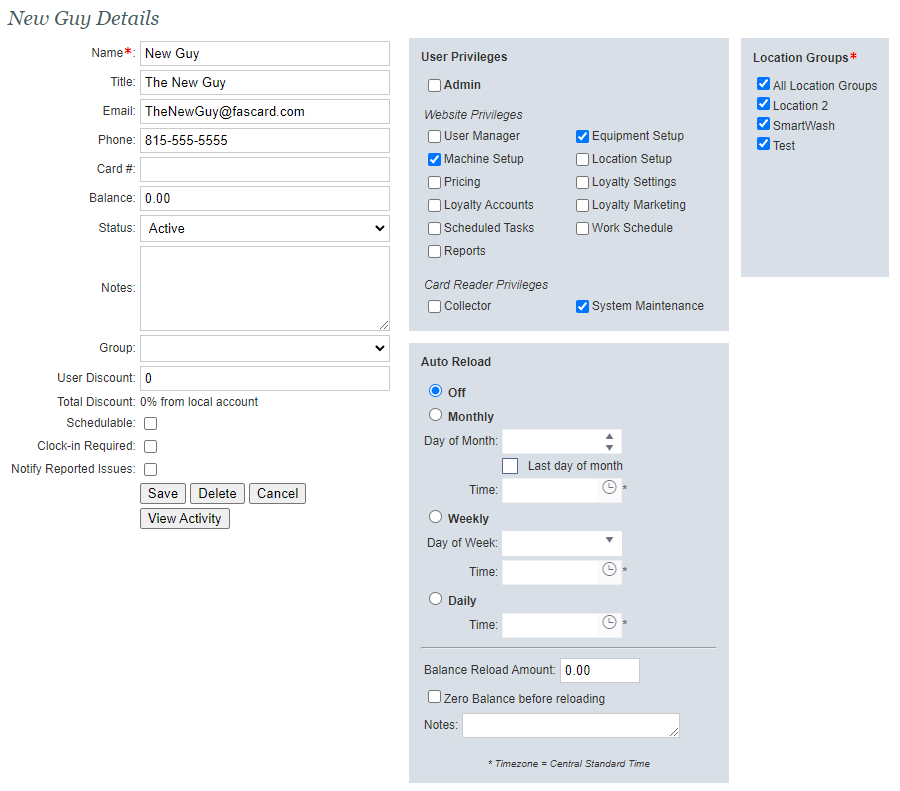
The User Privileges section allows Administrators to assign the appropriate level of employee access to the FasCard system.
Users can be linked across multiple FasCard accounts. Configuring a User account with the same email address in each FasCard account will automatically link the user to those accounts. This type of User would be considered a "Global User". All associated accounts can then be managed using the same login credentials, with user privileges specific to each account. Deleting the user account from a FasCard account will remove the account linkage without deleting the user account from other FasCard accounts. Only an Admin User may change the details of a Global User.
| User Privilege | |
|---|---|
| Administrator Account (All Privileges) | Users with this permission have full rights and access to all user privileges including access to the FasCard Admin Site - Server Management page and Users pages.
|
| POS (Point of Sale) User Privileges |
|
| Users with Website Privileges |
|
| Users with Card Reader Privileges |
|
| Users with No Assigned Privileges | User accounts with no assigned privileges are considered to be 'Card Only' users and have no special access to card reader functions or the FasCard Admin site. They may be assigned a card with a balance configured by an Admin or User Manager and their activity will be reported on the Employee Activity report. |
Understanding Locations and Location Groups
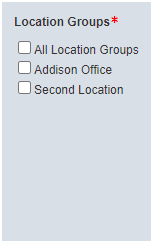
The Location section allows an administrator to assign which locations a selected user has access to. This limits user access to the selected locations. Select the individual locations for which the user will have access or select the All Locations option if multiple locations are configured. If Location Groups are enabled, individual groups may be selected from the list or given access to all location groups using the All Location Groups option.
Add, Edit, or Delete a User
- Navigate to the FasCard Admin site and sign in with Admin or User Manager credentials.
- Select the Account in which the user information is stored.
- Once the account is selected, click the Users tab.
Click Add New and complete the fields:
NOTE:
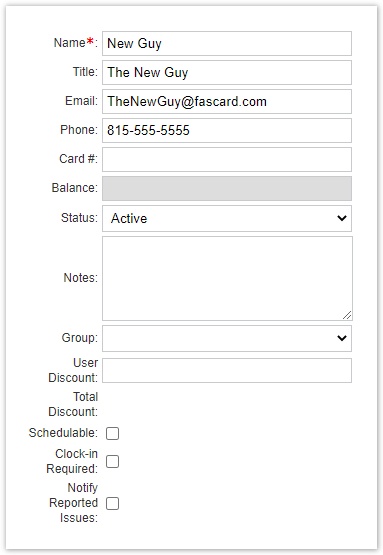
Only fields marked with an Asterisk(*) are needed to meet the minimum requirement; however, users without a configured email address cannot access the FasCard Admin site.
- Enter basic contact and other applicable information.
- Select the appropriate settings in the User Privileges section. For a more detailed explanation of these privileges, see User Privileges.
- If multiple locations or Location Groups are configured, the Locations section will appear adjacent to User Privileges and will be a required field.
- Select appropriate locations or location groups for the user.
- Select appropriate locations or location groups for the user.
- If multiple locations or Location Groups are configured, the Locations section will appear adjacent to User Privileges and will be a required field.
- Click the Save button near the bottom of the Details section.

Post-Creation
Users with Website Privileges and a valid email address will be sent an email to request a password be created for the account. Once a password is created, users with Website Privileges can now log into the FasCard Admin site.
Any Balance can be added to the user account if required.
- If Balance is added, click Save to finalize the account change.
Edit a User
Once a user is selected, the User Details section displays the basic information for a selected user and allows editing of user privileges and location access. Change any information and click Save when finished.

Delete A User
- Navigate to the User Accounts page under the Users tab.
- Use the search function or manually locate the user from the list.
- Select the user account by clicking the user name.
- Click Delete.
- Click OK to confirm deletion or click Cancel.
Once an employee user has been deleted, if there is any associated Loyalty Card with remaining funds, the card will not work.
Field Descriptions
| Field | Description |
|---|---|
Name | The name of the selected user (Required Field). |
| Title | The title of the selected user. |
| The email of the selected user will also be the username for logging onto the website. This field is not required, but a user without an email address will not be able to sign into the Admin site. This email address must be unique within the store account. | |
| Phone | The phone number of the selected user. |
| Card # | The card number that is being assigned to the user, if applicable. |
| Balance | The value that will be available to users when they use their card on a FasCard reader (Can only be set after the account is created). |
| Status | This drop-down menu allows a user's status to be changed. Active - User is granted access to the FasCard administration site. Inactive - User is not granted access to the FasCard administration site. Disabled - User is not granted access to the FasCard administration site or the mobile site/app through their user account. When disabled, users will not receive feedback notifications. |
| Notes | Open text area, only users with access to this page can view these notes. |
Group | The loyalty group that is associated with the selected user account. |
User Discount | This field allows a discount to be manually assigned to the user account. |
Total Discount | The discount amount the User account holder will receive off of participating equipment (See Pricing / Features on how to set participating equipment). |
| Schedulable | The user can be included in Work Schedules. |
| Clock-In Required | The user must clock in, in order to use their employee card. |
| Notify Reported Issues | Users will be notified if feedback is submitted through the mobile app. |
Group Assignments and Discounts
This section explains assigning a user to a specified Group and applying a percentage discount for the specific user.
To create a Loyalty Group for User assignment, you may review our Loyalty Groups guide here: FasCard Admin Site - Loyalty Groups
Assigning a User to a Loyalty Group
Users with the User Manager Website Privilege can assign users to a loyalty group. When a user is assigned to a Loyalty Group, that user shares the same applicable discounts as whomever else is assigned to that specific Group, whether it be employed personnel, customers, or a mixture of the two.
- Click the 'Group:' dropdown and select the Group you would want to assign said user to. (Note: Group dropdown selection is based on what Loyalty Groups you have previously created.)

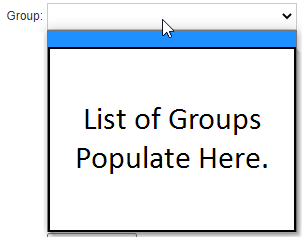
- Click Save to apply the saved group setting.
Applying a Percentage Discount to a User
Users with the User Manager Website Privilege can apply a discount of up to 100% to any User's account.
- In the 'User Discount:' field, type a numeric amount between 0-100 (max. 100) for applying a percentage discount of that number to the user's account.
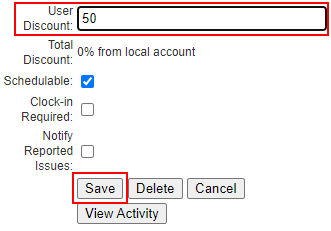
- Click Save to apply the setting.
Free Dry Credits
Employee user accounts should not be able to accumulate free dry credits. Should the rare instance where an employee user account does have free dry credits stored and are able to spend said credits, this is not intended.
Please contact CCI Technical Support immediately to aide in resolving this issue, if needed.
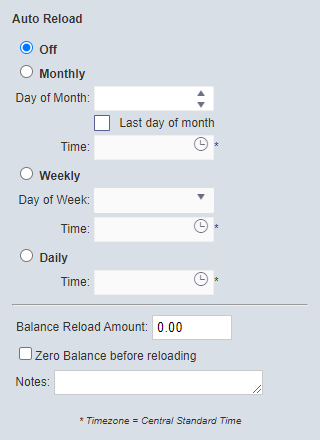
Auto Reload
This section allows users with the requisite privileges to configure an automatic value reload for the selected User account. To configure an Auto Reload, select from the following options:
NOTE: Auto Reload is only visible when selecting an existing user account or after the creation of a new user account.
The Auto Reload function does not process payment and serves strictly to reload the user's account and card balance.
| OPTION | SELECTION | |
|---|---|---|
| Monthly Reload |
|
|
| Weekly Reload |
| |
| Daily Reload |
| |
| Balance Reload Amount | This is the balance amount added to the User account when reloaded (balance represents cash value). | |
| Zero Balance/Bonus before reloading | If checked, the new balance will be equal to the reload amount. If left unchecked, the reload amount will be added to the existing balance. | |
| Notes | An optional field that ties an API-accessible-only note to its associated reload process. |
Creating A POS User
As mentioned above, a POS User can only be created by a FasCard account ADMIN User or CCI Technical Staff. A POS User is a specific user type created to generate a username and a password which may be needed to integrate a POS system with the FasCard System. Follow the steps below to create a POS User and generate a password.
- Use Admin credentials to log into the FasCard Admin site.
- Select the FasCard Account.
- Click the User Tab.
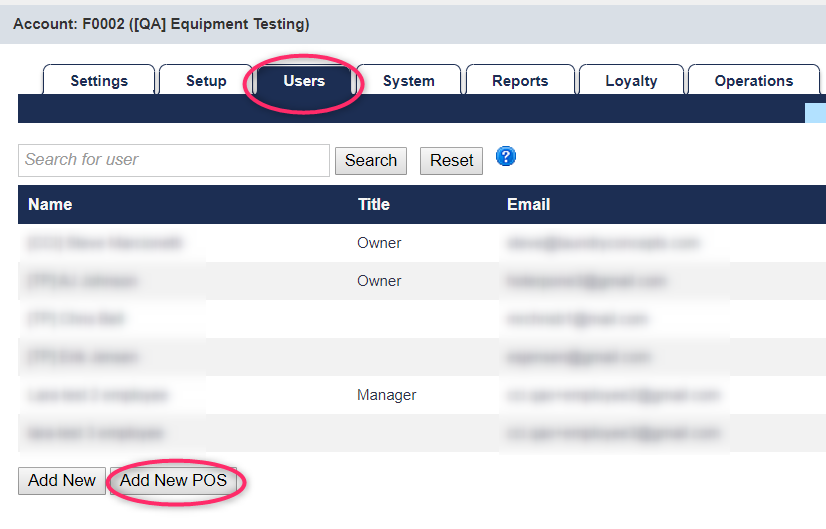
- Complete the fields below including the location where the POS is located.
- Click Save.
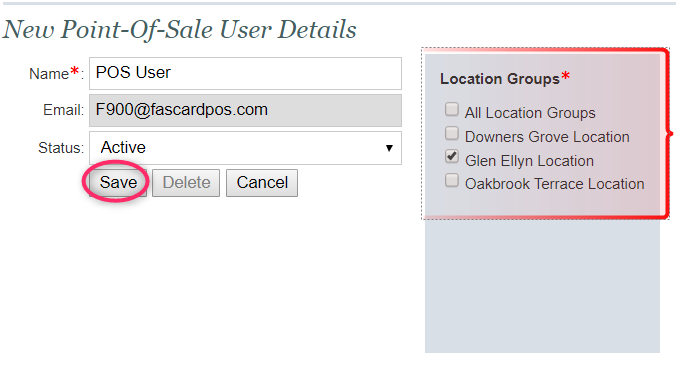
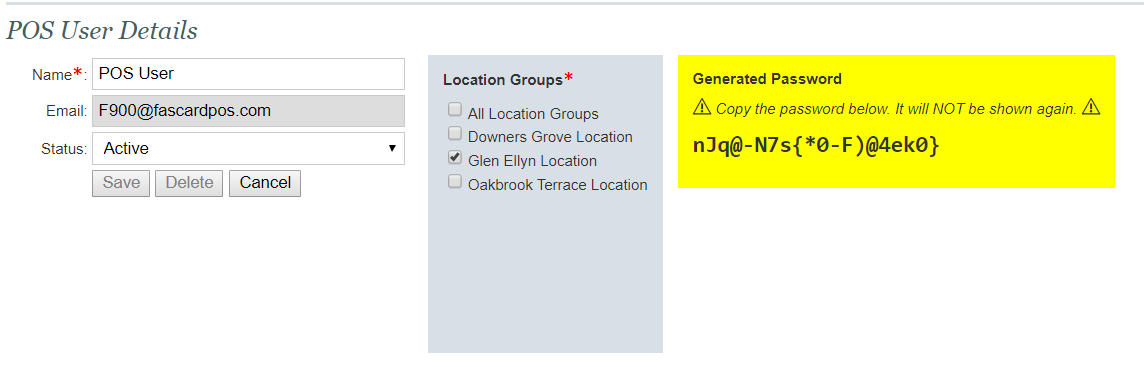
- Once Save is clicked, a one-time generated password will appear to the right, highlighted yellow.
- Copy this password. This is the password the POS System Administrator needs to integrate the POS System with FasCard.
- DO NOT CLICK SAVE AGAIN. CLICKING SAVE AGAIN WILL REGENERATE ANOTHER PASSWORD.
- The Email address is auto-generated and is not editable.
- It is the responsibility of the Store Owner to communicate the POS User email address and password, if needed, to the POS System Administrator.
- Click any other tab, or the User tab again to refresh the page to exit out of the POS user details.
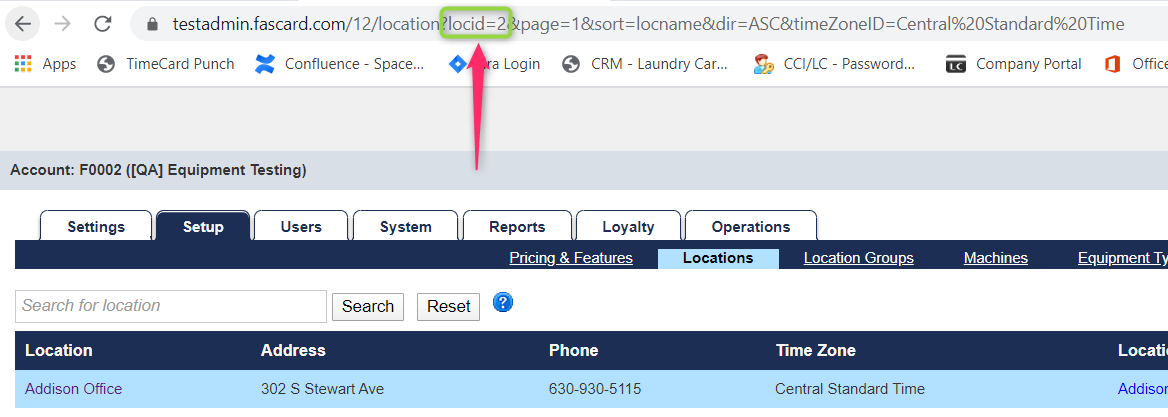
NOTE
During this setup, it's possible that the POS Vendor may need the location id to complete the POS setup. If so, this location id can be retrieved from the URL address. Simply click on the locations link and select the specific location that will use this POS. While the location is selected, look at the URL address and the number located next to "locid=". See the picture below where the location id is 2.
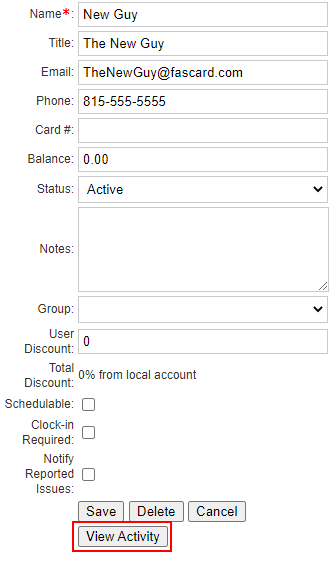
Viewing User Activity
When in a User's details, one can navigate to the User's Activity by selecting the View Activity button below the detailed information. Much like a Loyalty Account User's activity, this view details the card activity of a user. See the instructions below on how to navigate to a User's activity page.
- When logged in under your FasCard Account, select the Users Tab and the employee/user's activity you wish to see.
- Once in the User's details, select View Activity.
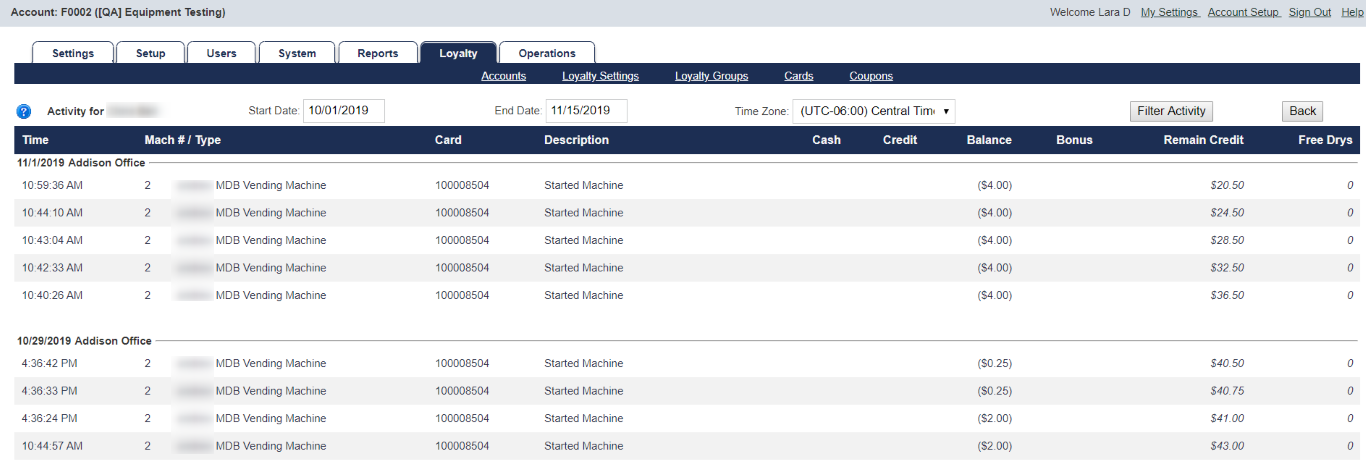
- Select the date range for the activity you wish to view and click Filter Activity

- The User's activity will display as below.
Multiple FasCard Accounts
A FasCard Owner can have more than just one FasCard Account. If an Owner has multiple FasCard Accounts, follow the steps below to set up the Owner's credentials to access multiple accounts.
- Navigate to the Owner's FasCard Account.
- Once the account is selected, click the Users tab.
- Click Add New and complete the fields.
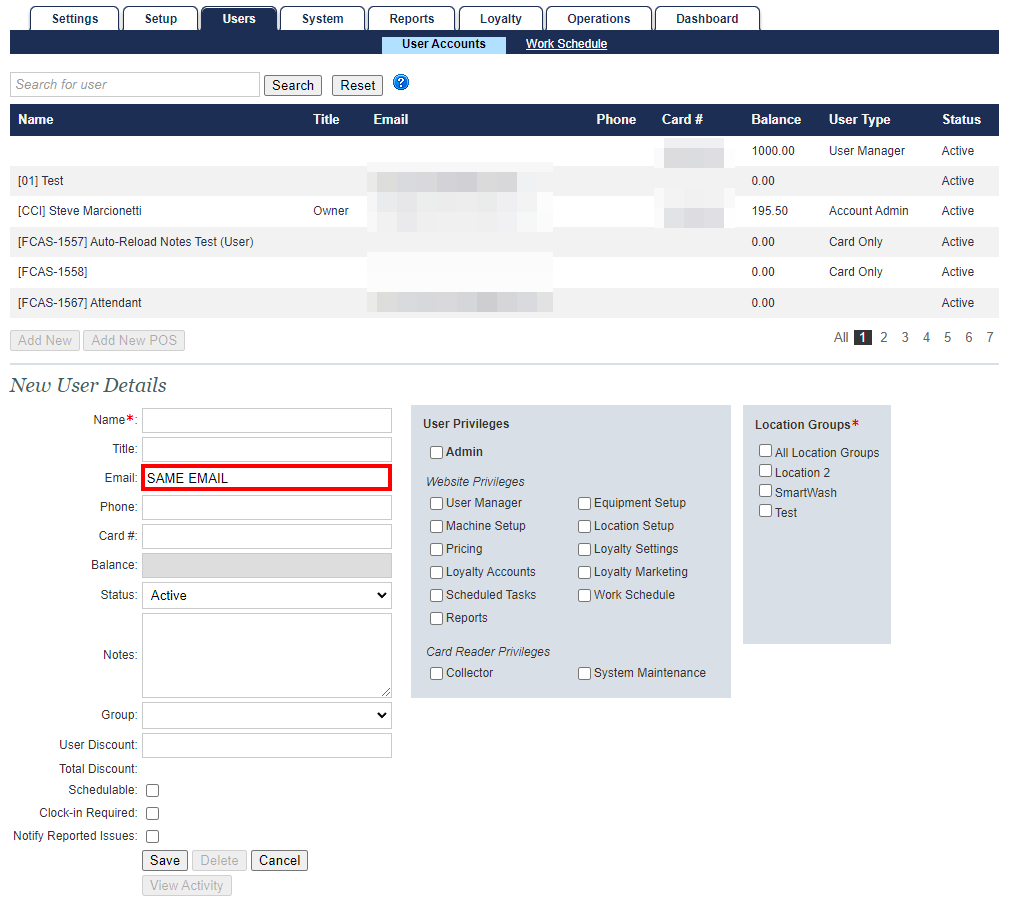
- Add the Owner as a new user and add the SAME email address.
- Click Save.
- Once saved, a successful message will display showing the additional accounts the Owner can access.
