FasCard Admin Site - Equipment Setup
This page provides detailed information regarding the accessibility and use of a FasCard/FLEX account's Equipment Types page from within the FasCard Admin Site.
- This page allows users to search for any portion of an equipment type name. Clicking Reset clears the search data.
- This page uses a standard list format that can be sorted by clicking any column header.
The Equipment Types Page
The Equipment Types page is only accessible by users with Admin privileges or with Equipment Setup privileges. This page is used to add, edit, and delete equipment types. The Equipment Types page may contain various configuration options depending on the make, model, and control of the host equipment type. See manufacturer specific functionality for details on what options are available.
Once an equipment type is configured, it will need to be applied to individual Machines before it becomes available for use.
Navigation
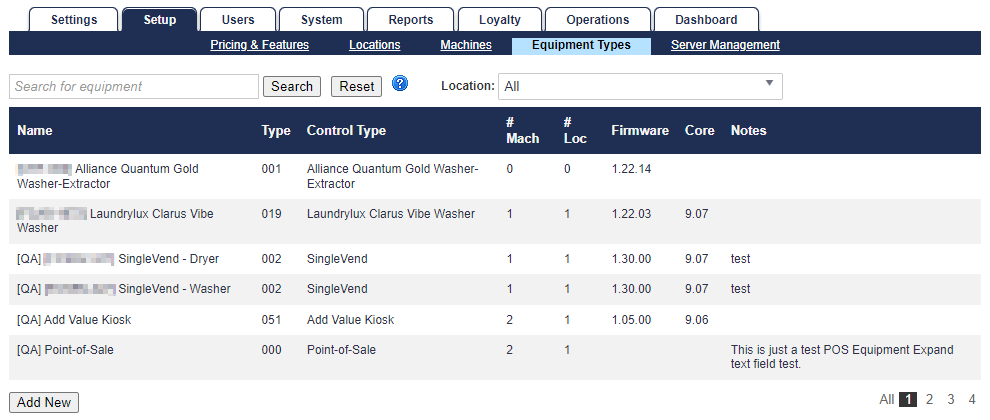
Navigating to the Equipment Types sub-tab under the Setup tab will display an alphabetical list of the equipment types that have been configured for the system. The default view will list up to 6 equipment types. Once there are more than 6 equipment types, page numbers will appear, allowing the user to scroll through the equipment list. Clicking anywhere on an equipment type row will display the additional details to be configured.
Core Mismatch
![]()
If equipment has previously been set up in an account, there is a possibility that one or more equipment types could be assigned a reader firmware using a different firmware core which may fundamentally affect how other equipment types on different cores could behave within a FasCard/FLEX system. When this is the case, a notification banner like the example above will display, while the Core column of the Equipment Types table will indicate what equipment types are on what version of firmware core.
Filtering Equipment Types by Location
By default, All equipment is visible when the Equipment Types tab is selected. To filter by location, select the location you want to isolate using the Location dropdown to the right of the Search section.

IMPORTANT
Functions described in the next few sections are for 'Singlevend' or 'Pulse' type machines. Store configuration may vary.
Adding Equipment Types
Adding a Point of Sale Equipment Type
FasCard can interact with other POS equipment types, for example, cash registers. In order to integrate a POS System with the FasCard system, the Store Owner must contact the organization that made the POS and inform them of the desire to integrate with the FasCard system. If you have any questions on the POS integration process, feel free to contact Steve Marcionetti at CCI 1(630) 930-5115. Once the POS integration is complete, the POS equipment type can be added to the FasCard System by following the steps below.
NOTE: To create a POS equipment type, use the "Point-of-Sale" dropdown option. There is no configuration for a POS equipment type on the FasCard end.
Navigate to the FasCard Admin site and sign in with an Admin or Equipment Setup account.
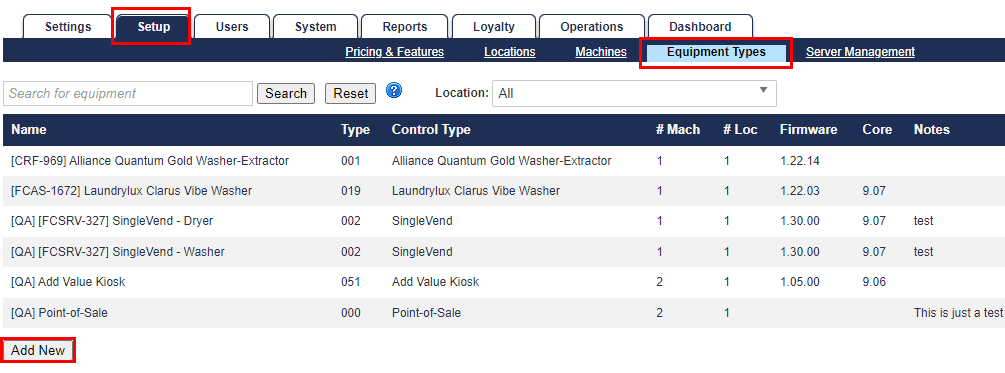
Click the Setup tab.
Click the Equipment Types link.
Click Add New.
From the dropdown menu in the 'Please Select an Equipment Type' section, select SingleVend (or applicable selection).
Note: This selection can depend on a few different factors. Contact CCI Technical Support for more information.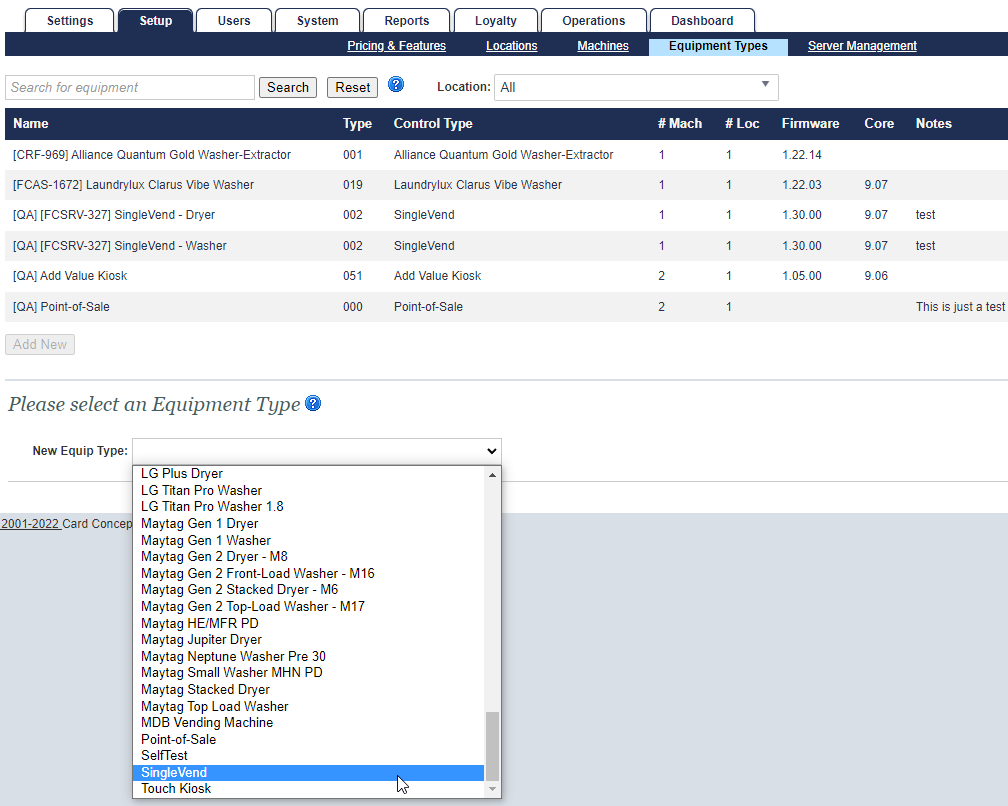
Equipment types are also distinguishable by location in the Locations tab.
Configuring the Equipment Settings
Refer to the chart below for a more in-depth description of the fields to be completed. Note: there are no configurations for a POS equipment type.
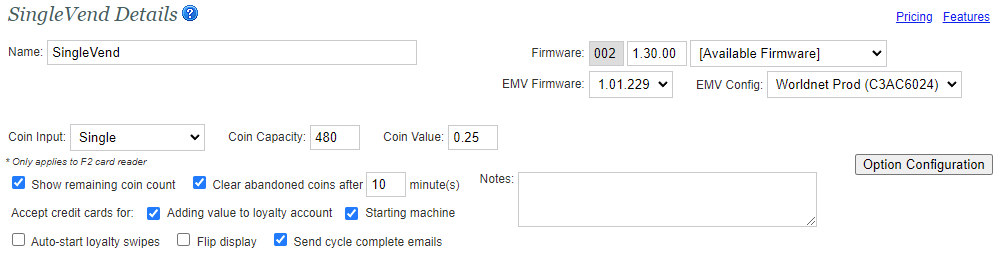
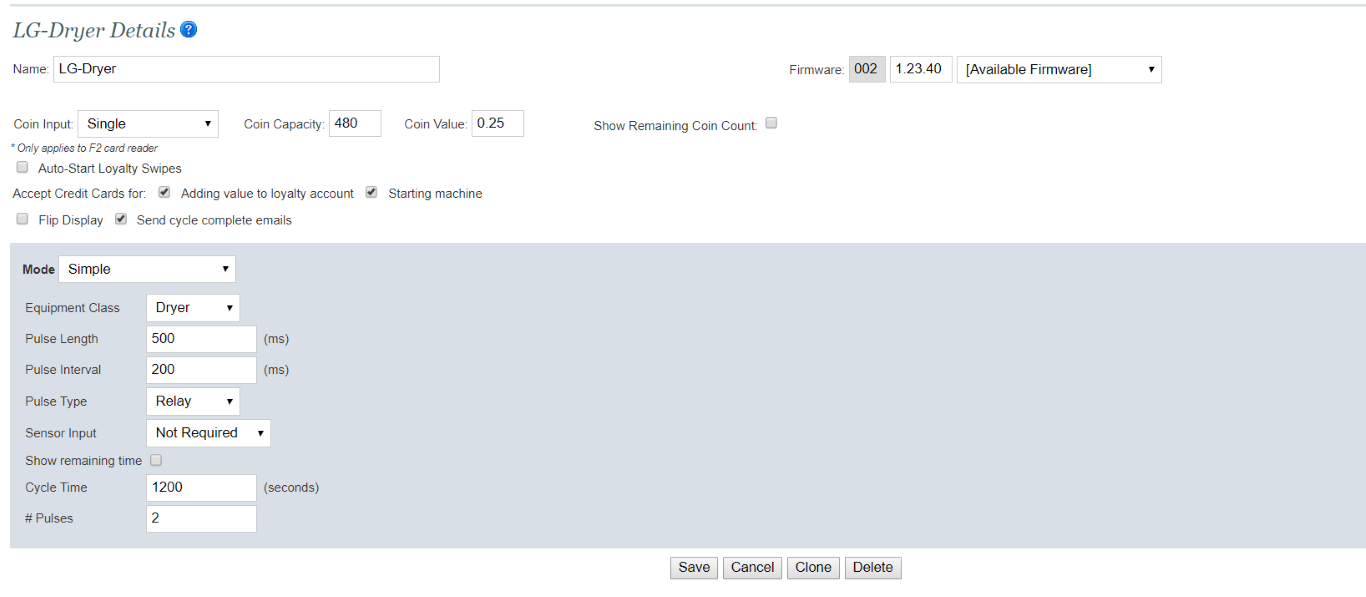
Enter the name of the equipment in the Name field. This is the equipment name that will be displayed for this equipment type in various reports.
- If an equipment name is longer than 12 characters, the following notice will display:

- If an equipment name is longer than 12 characters, the following notice will display:
Coin input - This drop down box determines the source input for the reader.
Coin Capacity and Value, configure if necessary.
- Clear abandoned coins after XX minute(s) - This field applies if you intend to have machines only hold a remaining coin balance for less than or greater than the default 10 minute duration.
Auto Start Loyalty Swipes - Check this box if you want this machine to automatically start when a customer swipes their loyalty card. (There must be enough value on the loyalty card for the auto-start to work.)
Accept Credit Cards: check the items 'Adding value to loyalty account' and 'Starting machine' as applicable.
Flip Display- check this if the FasCard reader is being mounted in an inverted orientation. (For F1 Readers only)
Send cycle complete emails: check this item if this equipment type should send cycle complete emails (emails are only sent if user preference is configured to receive email).
Field | Description |
|---|---|
Name | Friendly name for equipment type. Equipment types are not distinguished by location. Configuring equipment types with detailed names denoting machine model and location is recommended. Note: The Again, while this may not affect machine operation, in the FasCard Loyalty App/Site, the name will be truncated with ( . . . ) at the end if initially set up with a long name. |
Firmware / EMV Firmware / EMV Config | This field displays the configured firmware, EMV firmware, and EMV config version. New equipment setup uses the default firmware version as determined by CCI. EMV versions only apply to F3 FasCard readers. Only Support and Administrative personnel have access to this feature. |
Coin Input | This drop down box determines the source input for the reader
|
Show Remaining Coin Count | This checkbox determines if an F1: FasCard Wireless Reader will display the remaining coin count. The F2: FasCard Touchscreen Reader will never display the remaining coin count. F2 readers will, however, display "Insert Coins". |
Clear abandoned coins after XX minute(s) | This field allows the adjustment of the length of idle time before a reader clears any outstanding coin balance remaining. This amount will, then, be reported as 'Uncredited Coin' on a machine. IMPORTANT: This feature only works with equipment types using reader firmware Core 9.07+ and SatWare 1.29.02+ |
Auto-Start Loyalty Swipes | Checking this box allows a machine to automatically start when a customer swipes their loyalty card. (There must be enough value on the loyalty card for the auto-start to work.) |
Accept Credit Cards For | This setting configures how credit cards can be used at the card reader / kiosk.
|
Flip Display | This check box will rotate the LCD display so that the reader can be mounted in a horizontal or upside down orientation. Used for lid mount or high mount installations. |
Send cycle complete emails | This check box will allow this equipment type to send loyalty account emails when cycles are at 90% complete- this feature must be enabled on user accounts either via the accounts page or mobile site. |
| Notes | Open text field allows for any notes, viewable only to users who have access to this page. Information typed in this field also displays as the last column in the Equipment Types table. |
The values in the section below should be configured with guidance from CCI support. Changing the values for an equipment type can prevent a machine from starting or performing properly.
The options below assume that SingleVend firmware version 1.13.01 or greater is installed on card reader.
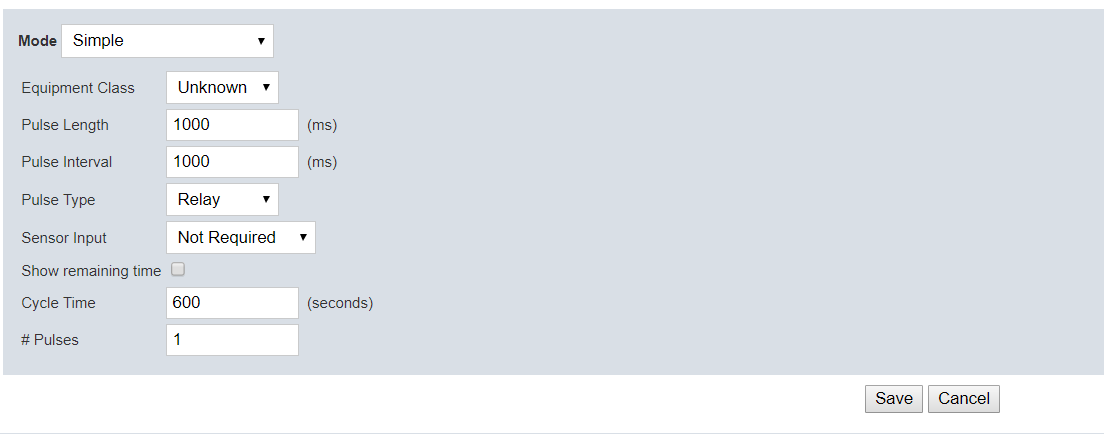
Configure Equipment Settings - Continued
Refer to the chart below for a more in-depth description of the fields to be completed.
- The Mode dropdown menu allows for multiple types of pulse configuration. See Configuring SingleVend Mode for more information.
- Select an Equipment Class from the dropdown menu - classes include Washer, Dryer, Vending, etc.
- Enter the desired Pulse Length in the appropriate field.
- Enter the desired Pulse Interval in the appropriate field.
- Pulse Type should remain set to 'Relay' unless otherwise instructed by CCI Support or machine specific documentation.
- Sensor Input should remain set to 'Not Required' unless otherwise instructed by CCI Support or machine specific documentation.
- Show remaining time - checking this will cause the FasCard reader to display the estimated remaining cycle time.
- Cycle Time - enter the cycle length configured on the machine.
- # of Pulses - this specifies the number of pulses to be sent to the machine. Typically the number of pulses is equal to the number of coins required to start.
- Click Save.
| Field | Description |
|---|---|
| Mode | This dropdown menu allows selection of different pulse configuration types. |
Equipment Class | This dropdown menu is used to indicate the type of machine being configured. The correct machine class needs to be set in order for the machine to appear on the customer loyalty site. |
| Pulse Length | A value in milliseconds denoting the length of time that the FasCard reader will engage its relay. For example, setting the value to 2000 will trigger the relay for 2 seconds before returning to idle state. |
| Pulse Interval | A value in milliseconds denoting the length of time that the FasCard reader will pause in between pulses. |
| Pulse Type | Determines what kind of pulse the reader will send to machine, based upon intermediary harness.
|
| Sensor Input | A drop down menu, indicates to the FasCard reader whether it should monitor an external circuit before allowing a start. This is typically used with machines and harnessing that utilize door sensors.
|
| Show Remaining Time | When checked, this option instructs the card reader to display an estimated count down timer as configured by the 'Cycle Time' (below). If this option is unchecked the card reader will not display a count down time and will display 'Machine In Use' for the duration of the configured 'Cycle Time'. |
| Cycle Time | The length of time of the shortest cycle on the host machine. Pulse configurations have no direct connection to the machine control board- this cycle time is an estimate based upon configuration. |
# Pulses | The number of pulses (simulated coins) required to start host machine. |
Editing an Equipment Type
Once an Equipment Type is selected, the Equipment Details section displays the basic information for the selected Equipment Type and allows the configuration to be edited. To add a new Equipment Type, click Add New - the same basic fields will be displayed for editing.
The equipment type detail section displays the configuration details for a selected equipment type.
- Pricing - This link opens the Pricing configuration page for the equipment type being configured.
- Features - This link opens the Features configuration page for the equipment type being configured.
Cloning an Equipment Type
An existing equipment type may be cloned. This allows the operator to duplicate an existing equipment type to retain the core settings but alter other options (such as pricing) for use in separate locations, without repeating the work of creating the equipment type. The cloned equipment type will retain the original name and be appended with the word "Copy". This equipment name may then be edited as normal.
Delete an Equipment Type
To delete an equipment type, navigate to the FasCard Admin site and sign in with an Admin or Equipment Setup account and follow the steps below.
- Click the Setup tab.
- Click the Equipment Types link.
- Use the search bar or browse for the equipment type to be deleted.
- Click the equipment type name.
- Click Delete.
- Click OK when prompted to confirm deletion, or click Cancel.